Printer setup made easy! Connecting your Brother printer to WiFi is simpler than you think. In this step-by-step guide, you’ll learn how to effortlessly link your printer to your wireless network. Say goodbye to tangled cables and hello to convenient printing from anywhere in your home or office. Follow these clear instructions to get your Brother printer up and running on WiFi in no time.
Key Takeaways:
- Ensure Printer and WiFi are Ready: Before starting the process, make sure your Brother printer is turned on and in a ready state, and your WiFi network is up and running.
- Access Printer’s Network Settings: Navigate to your printer’s control panel, select the WiFi network option, and enter your WiFi’s SSID and password to connect the printer to your network.
- Verify Connection: Once the setup is complete, print a test page to confirm that your Brother printer is successfully connected to your WiFi network.
Preparing Your Brother Printer for WiFi Connection
Gathering Required Information and Equipment
Before you begin the process of connecting your Brother printer to WiFi, you need to gather some important information and equipment. Make sure you have the following items ready: your wireless network name (SSID) and password, a computer or mobile device connected to the same WiFi network, and the Brother printer’s power cable.
Understanding Your Printer’s WiFi Capabilities
Some Brother printers have built-in WiFi capabilities, while others require a wireless network adapter. Check your printer’s manual or specifications to determine if it can connect to WiFi on its own or if you need to purchase an adapter separately. Understanding your printer’s WiFi capabilities will help you prepare for the setup process.
Required Information: If your Brother printer has built-in WiFi, you can easily connect it to your wireless network without needing any additional hardware. However, if your printer requires a wireless network adapter, make sure to purchase the correct one that is compatible with your printer model.
Printer Compatibility: Brother printers with WiFi capabilities allow you to print wirelessly from any device connected to the same network. This convenience enables you to print from anywhere within the range of your WiFi network, making printing tasks more efficient and hassle-free.
Factors to Consider Before Connecting Your Brother Printer to WiFi
Network Security and Passwords
You should always ensure that your network is secure before connecting your Brother printer to WiFi. Make sure to use a strong and unique password to prevent unauthorized access to your network. This will help protect your printer and personal information from cyber threats.
This step is crucial as it helps in maintaining the privacy and security of your data. It is recommended to use WPA2 encryption for secure communication between your printer and the WiFi network.
Printer Location and Signal Strength
If you want to ensure a stable connection, you need to consider the location of your Brother printer and the signal strength of your WiFi network. Place your printer in a central location to ensure that it receives a strong and consistent WiFi signal. This will help prevent connectivity issues and ensure smooth printing.
Another important factor to consider is the distance between your Brother printer and the WiFi router. Make sure there are no obstacles blocking the signal between the two devices, such as walls or electronic devices that can cause interference.
Interference from Other Devices
While setting up your Brother printer on WiFi, you need to consider potential interference from other devices. Devices like microwaves, cordless phones, and Bluetooth devices can disrupt the WiFi signal and cause connectivity issues. Make sure to place your printer away from such devices to ensure a stable connection.
Signal interference can lead to poor print quality and connectivity problems. By minimizing the presence of other electronic devices near your printer and WiFi router, you can ensure a smooth printing experience without interruptions.
How to Connect Your Brother Printer to WiFi Using the Control Panel
Navigating the Printer’s Menu System
Despite the convenience of wireless printing, setting up a Brother printer to connect to your WiFi network may seem daunting at first. However, the process can be made simple by using the printer’s control panel. You can navigate through the menu system on the printer to connect it to your WiFi.
Selecting the WiFi Network Option
WiFi networks can vary and may not always be straightforward to connect to. To select the WiFi network option on your Brother printer, you need to locate the ‘Settings’ or ‘Network’ option in the printer’s menu. From there, you can choose the ‘WiFi’ or ‘Wireless’ option to begin the connection process.
It’s important to ensure that your printer is within range of your WiFi network to successfully establish a connection. If the network requires a password, you will be prompted to enter it during the setup process. Select your WiFi network from the list of available networks displayed on the printer’s screen.
Entering Network Password and Authentication Details
Your WiFi network may be secured with a password, and you will need to enter this information on your Brother printer. Once you have selected your WiFi network, you will be prompted to enter the network password using the printer’s keypad or touchscreen display. Follow the on-screen instructions to input the password accurately.
Plus, if your WiFi network utilizes any authentication method such as WEP or WPA, you may need to enter additional details during the setup process to ensure a secure connection. Your Brother printer will guide you through the steps to enter these authentication details to successfully connect to your WiFi network.
Alternative Methods for Connecting Your Brother Printer to WiFi
Using the Brother iPrint&Scan App
To connect your Brother printer to WiFi using the Brother iPrint&Scan app, you need to first install the app on your mobile device. Once installed, open the app and follow the on-screen instructions to add your printer. Make sure your printer is turned on and within range of your WiFi network. The app will guide you through the process of connecting your printer to WiFi seamlessly.
WPS (Wi-Fi Protected Setup) Push Button Method
If your Brother printer and WiFi router support WPS, you can use the Push Button Method to connect them. Simply press the WPS button on your router and then press the WPS button on your printer within two minutes. The devices will automatically establish a secure connection, allowing your printer to join your WiFi network.
The WPS Push Button Method is a quick and easy way to connect your Brother printer to WiFi without the need for entering network credentials manually. It provides a secure connection between your printer and router, ensuring smooth communication between the devices.
WPS PIN Method
Clearly, if your printer and router do not have a WPS button, you can still use the WPS PIN Method to connect your Brother printer to WiFi. This method involves entering a unique PIN provided by your printer into your router’s settings. By following the step-by-step instructions in your printer’s user manual, you can establish a wireless connection using the WPS PIN Method.
The WPS PIN Method is another convenient way to connect your Brother printer to WiFi securely. By entering the designated PIN into your router, you can establish a reliable connection without the need to manually enter network information.
Troubleshooting Common WiFi Connection Issues
Printer Not Detecting WiFi Network
Many times, your Brother printer may not be able to detect your WiFi network. There’s a chance that the printer is out of range or there is interference causing the issue. To resolve this, try moving the printer closer to the router and ensure there are no electronic devices or obstacles blocking the signal. Additionally, check if other devices can connect to the WiFi network successfully to rule out any router issues.
Unable to Connect to WiFi Network
There’s a possibility that you are unable to connect your Brother printer to the WiFi network due to an incorrect password or network settings. Make sure you enter the correct WiFi password and check if the network settings on the printer match your router’s settings. Some Brother printers have a WiFi Protect Setup (WPS) button that allows you to connect easily by pressing the button on your router.
Troubleshooting: If you still can’t connect, restart your router and printer, ensuring they are both turned on and functioning properly. You can also try resetting the printer’s network settings and reconfiguring the WiFi connection from scratch.
Printer Connected but Not Printing
Network issues such as a change in router settings or IP address can sometimes cause your printer to be connected to WiFi but unable to print. Troubleshooting this requires checking the printer’s IP address and ensuring it matches the one set in the printer driver on your computer. If they do not match, you will need to update the settings accordingly.
To resolve this, you may need to uninstall and reinstall the printer driver on your computer, ensuring it is compatible with both the printer and your WiFi network. If the issue persists, contact Brother customer support for further assistance in resolving the network connection problem.
Tips for Maintaining a Stable WiFi Connection
Unlike the good old days of wired connections, maintaining a stable WiFi connection can sometimes be a challenge. However, there are several tips and tricks you can follow to ensure that your Brother printer stays connected to your WiFi network without any interruptions.
Regularly Updating Printer Firmware
You may not realize it, but outdated printer firmware can actually impact your printer’s performance and its ability to stay connected to your WiFi network. You should regularly check for firmware updates for your Brother printer and install them as soon as they are available. Firmware updates often include bug fixes and improvements that can help stabilize your printer’s WiFi connection.
Restarting Printer and Router
Stable WiFi connections can often be restored by simply restarting both your printer and router. This process can help refresh the connection between the two devices and clear any temporary glitches that may be causing connectivity issues. Make it a habit to restart both your printer and router periodically to maintain a stable WiFi connection.
Reducing Interference from Other Devices
Reducing the interference from other devices in your home or office can also help maintain a stable WiFi connection for your Brother printer. Devices such as cordless phones, microwave ovens, and even neighboring WiFi networks can interfere with your printer’s connection. To minimize interference, try to keep your printer away from such devices and networks.
Knowing how to troubleshoot common WiFi connectivity issues and following these tips can help you maintain a stable connection between your Brother printer and your WiFi network.
How to Change WiFi Network Settings on Your Brother Printer
Changing WiFi Network Password
To change the WiFi network password on your Brother printer, follow these steps. First, access the printer’s menu by pressing the Menu button on the control panel. Use the navigation arrows to select the “Network” option and then choose “WLAN.” Next, select “TCP/IP” and then “Setup TCP/IP.” Here, you can enter the new WiFi network password provided by your network administrator or ISP. Once you have entered the new password, press OK to save the changes.
Switching to a Different WiFi Network
Changing the WiFi network on your Brother printer is a simple process. First, access the printer’s menu and navigate to the “Network” option as mentioned before. Select “WLAN” and then choose “Setup Wizard.” Your printer will search for available WiFi networks. Select the new WiFi network you want to connect to and enter the password if required. Once the connection is established, your Brother printer will be connected to the new WiFi network.
Changing to a different WiFi network on your Brother printer allows you to easily switch between networks based on your needs. Whether you’re moving your printer to a new location or changing internet service providers, updating the WiFi network settings ensures seamless printing functionality.
Resetting WiFi Settings to Default
Now, if you need to reset the WiFi settings on your Brother printer to default, you can do so by accessing the printer’s menu and navigating to the “Network” option. Choose “Network Reset” or “Factory Reset” to restore all network settings to their original configuration. This will remove any saved WiFi networks and passwords, allowing you to start fresh with setting up a new connection.
It’s important to note that resetting the WiFi settings to default will erase all network configurations, including any previously saved WiFi networks. Make sure to have your new WiFi network information on hand before performing this reset to ensure quick and easy setup.
Understanding Brother Printer WiFi Security Features
WEP, WPA, and WPA2 Encryption
For securing your Brother printer’s WiFi connection, you can utilize encryption protocols like WEP (Wired Equivalent Privacy), WPA (WiFi Protected Access), and WPA2. These encryption methods help in protecting your network from unauthorized access by encrypting the data transmitted between your printer and the WiFi network.
MAC Address Filtering
Security features like MAC Address Filtering allow you to specify which devices can connect to your Brother printer based on their unique MAC addresses. By configuring this feature, you can ensure that only trusted devices with specific MAC addresses are allowed to communicate with your printer.
Understanding MAC Address Filtering – This feature adds an extra layer of security to your printer’s WiFi network by only permitting devices with pre-approved MAC addresses to connect. By manually entering the MAC addresses of your devices into the printer’s settings, you can control and monitor the devices that can access your printer.
Firewall Settings
Any modern Brother printer equipped with WiFi connectivity comes with built-in firewall settings that protect your printer from external threats and vulnerabilities. By enabling the firewall settings, you can safeguard your printer from unauthorized access and potential cyber-attacks.
A firewall acts as a barrier between your printer and the internet, monitoring and controlling incoming and outgoing network traffic. It helps in filtering out malicious data packets and ensures that only legitimate connections are established, enhancing the overall security of your Brother printer’s WiFi network.
How to Print Wirelessly Using Your Brother Printer
Printing from a Computer or Mobile Device
For printing wirelessly from your computer or mobile device using your Brother printer, you’ll first need to ensure that your device is connected to the same Wi-Fi network as your printer. Once connected, you can easily send print jobs to your Brother printer without the hassle of cords and cables.
While printing from a computer, you can simply select the file you want to print, choose the Brother printer from the list of available printers, and hit print. For mobile devices, you can download the Brother iPrint&Scan app, which allows you to print directly from your smartphone or tablet.
Printing from Cloud Services
Using your Brother printer, you can easily print documents and photos stored in cloud services such as Google Drive, Dropbox, and OneDrive. With cloud printing capabilities, you can access and print your files from anywhere, whether you’re at home, in the office, or on the go.
This feature is especially convenient for those who work with documents stored in the cloud and need to quickly print them out. You can simply access your cloud storage through the Brother iPrint&Scan app or the printer’s control panel, select the file you want to print, and send it to your Brother printer with just a few taps.
Printing from Email
This feature allows you to print documents and images directly from your email account using your Brother printer. You can simply email the file you want to print to your printer’s unique email address, and the document will be printed out in no time.
Printing from email is a convenient option for those who frequently receive important documents or images via email and need a quick and easy way to print them. You can easily set up your printer’s email address and start printing from your inbox with just a few simple steps.
Managing Multiple Brother Printers on the Same WiFi Network
Assigning Static IP Addresses
All Brother printers on your WiFi network must have unique IP addresses to avoid conflicts and ensure smooth functioning. To assign static IP addresses to your Brother printers, you will need to access your router’s settings. Log in to your router’s admin panel using a web browser and navigate to the DHCP configuration section. Here, you can manually assign a specific IP address to each Brother printer based on its MAC address.
Configuring Printer Priority
Network congestion can sometimes lead to slow printing speeds or interrupted print jobs when multiple Brother printers are connected to the same WiFi network. To prioritize the printing tasks, you can configure printer priority settings in your router. By assigning a higher priority to the Brother printer you use most frequently, you can ensure that your print jobs are processed faster and without delays.
It is vital to periodically review and adjust the printer priority settings based on your current printing needs and usage patterns. This way, you can optimize the printing process and avoid potential bottlenecks in your network.
Monitoring Printer Status
An vital aspect of managing multiple Brother printers on the same WiFi network is monitoring their status regularly. By accessing the printer settings through the Brother iPrint&Scan app or the printer’s web portal, you can check the ink levels, paper availability, and any error messages. This proactive approach allows you to address any issues promptly and ensures that all printers are ready for use when you need them.
Understanding the status of each Brother printer helps you anticipate maintenance requirements and prevent potential printing problems. By staying informed about the condition of your printers, you can take timely actions to keep them running smoothly and minimize downtime.
Common Errors and Solutions When Connecting Brother Printer to WiFi
Error Messages and Codes
Not all connections go smoothly, and you may encounter some error messages or codes when trying to connect your Brother printer to WiFi. These messages can be frustrating, but they usually indicate a specific issue that needs to be addressed.
Troubleshooting Printer Offline Issues
Even after successfully connecting your Brother printer to WiFi, you may still encounter issues where the printer shows as offline. This can happen due to a variety of reasons, such as network configuration issues or communication errors between the printer and your computer.
Even though your printer is showing as offline, it doesn’t necessarily mean there is a major problem. Sometimes, simply restarting the printer or your computer can help resolve this issue and bring the printer back online.
Resolving Connectivity Issues
WiFi connectivity issues can also arise when setting up your Brother printer. These can be related to signal strength, network settings, or interference from other devices. To troubleshoot these issues, you may need to check your WiFi signal, move the printer closer to the router, or adjust your network settings.
Brother provides helpful troubleshooting guides and resources on their website to assist you in resolving any connectivity issues you may encounter. If you are still experiencing problems, reaching out to Brother’s customer support can also help you get your printer connected to WiFi successfully.
Advanced WiFi Settings for Brother Printers
Keep your Brother printer running smoothly by configuring advanced WiFi settings. Below are some key settings you should be aware of:
Configuring DNS and DHCP Settings
| DNS Settings | DHCP Settings |
| Allows you to specify a primary and secondary DNS server for your printer. | Enables your printer to obtain an IP address automatically from a DHCP server. |
Settings Configuring DNS and DHCP Settings
Settings such as DNS (Domain Name System) and DHCP (Dynamic Host Configuration Protocol) are important for your printer to communicate effectively over the network. By configuring DNS settings, you ensure that your printer can translate domain names to IP addresses accurately. DHCP settings, on the other hand, allow your printer to obtain a unique IP address automatically whenever it connects to the network. This dynamic assignment simplifies network management and avoids IP address conflicts.
Setting Up Port Forwarding
| Port Forwarding | |
| Facilitates inbound communication to specific ports on your printer from external networks. |
Settings Setting Up Port Forwarding
Brother printers support port forwarding, which allows external devices or networks to establish communication with your printer through specific ports. By setting up port forwarding, you can remotely access your printer for tasks like printing or monitoring its status. This feature enhances your printer’s accessibility and versatility across various network environments.
Brother printers can be accessed remotely by setting up port forwarding on your router. With port forwarding configured for your printer’s specific ports, you can conveniently print documents or manage printer settings even when you are not on the same network. This advanced networking feature expands the usability and convenience of your Brother printer.
Enabling SSL/TLS Encryption
| SSL/TLS Encryption | |
| Secures data transmitted between your printer and other devices using encryption protocols. |
Settings Enabling SSL/TLS Encryption
With SSL/TLS encryption enabled on your Brother printer, you can enhance the security of data exchanged over the network. This encryption protocol ensures that sensitive information, such as print jobs or printer configurations, remains confidential and protected from unauthorized access. By enabling SSL/TLS encryption, you can safeguard your printer’s data transmission and prevent potential security breaches.
With SSL/TLS encryption activated, your Brother printer establishes a secure communication channel with connected devices, ensuring that data transmission is encrypted and secure. This feature is vital for protecting sensitive information and maintaining the confidentiality of your print jobs and printer settings.
Best Practices for WiFi Printer Security
Regularly Updating Printer Firmware
Printer firmware updates are crucial to keep your device secure from potential vulnerabilities. By regularly updating your printer firmware, you ensure that any known security flaws are patched, reducing the risk of unauthorized access to your printer.
Using Strong Network Passwords
The first line of defense for securing your printer on a WiFi network is to have a strong network password. Weak passwords are easy targets for hackers looking to gain access to your printer and potentially sensitive information. By setting a complex password with a mix of numbers, letters, and special characters, you significantly enhance the security of your printer.
The complexity of your network password plays a crucial role in safeguarding your printer from unauthorized access. Avoid using easily guessable passwords such as “password” or “123456” and opt for a unique combination that is hard to crack.
Limiting Printer Access
By limiting access to your printer, you can control who can use it and reduce the risk of unauthorized usage. You can set up access controls on your printer, such as requiring a password to print or scan, to ensure that only authorized users can utilize the device.
With restricted access to your printer, you can prevent unauthorized individuals from sending print jobs or accessing sensitive documents. By implementing access restrictions, you add an extra layer of security to your printer and enhance overall network security.
Conclusion
With this in mind, you now have a step-by-step guide on how to successfully connect your Brother printer to WiFi. By following these instructions, you can ensure that your printer is set up correctly and ready to use wirelessly. Remember to double-check all the settings and passwords to avoid any connectivity issues.
Now that your Brother printer is connected to WiFi, you can enjoy the convenience of printing from anywhere in your home or office. No longer will you need to worry about plugging in cables or being close to the printer. Take advantage of this wireless capability and streamline your printing process. If you ever encounter any difficulties, refer back to this guide for troubleshooting tips or reach out to Brother’s customer support for assistance. Happy printing!
FAQ
Why is it important to connect my Brother printer to WiFi?
Connecting your Brother printer to WiFi allows you to print wirelessly from any device on the same network, increasing convenience and flexibility.
How do I find the WiFi network name (SSID) and password?
You can find the WiFi network name (SSID) and password on your router’s label or through your network administrator. If you’re unable to locate this information, you may need to contact your Internet Service Provider.
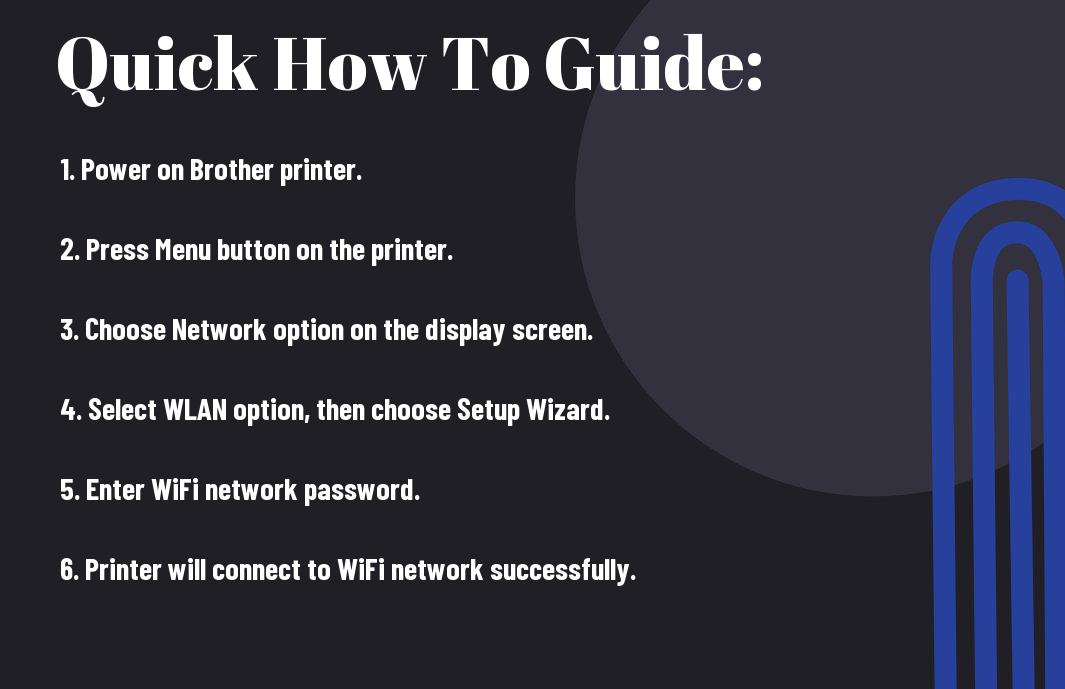
What are the steps to connect my Brother printer to WiFi?
The steps to connect your Brother printer to WiFi are:
- Press the Menu button on your Brother printer.
- Use the Up or Down arrow key to select Network and press OK.
- Select WLAN and press OK.
- Select Setup Wizard and press OK.
- Choose your WiFi network and enter the password when prompted.
- Once connected, your Brother printer will print a confirmation report.
What should I do if my Brother printer is not connecting to WiFi?
If your Brother printer is not connecting to WiFi, try the following troubleshooting steps:
- Ensure the WiFi network name (SSID) and password are entered correctly.
- Move your printer closer to the WiFi router for a stronger signal.
- Restart your printer and router.
- Check for any firmware updates for your printer.
If the issue persists, contact Brother customer support for further assistance.
Can I connect multiple devices to my Brother printer over WiFi?
Yes, once your Brother printer is connected to WiFi, multiple devices on the same network can print to the printer wirelessly, adding convenience for all users.