Camera enthusiasts, have you ever struggled with connecting your WiFi panorama camera to your phone? In this step-by-step guide, you will learn how to effortlessly link your camera and phone, ensuring seamless photo transfers and remote control capabilities. Follow these simple instructions to enhance your photography experience.
Key Takeaways:
- Ensure correct compatibility: Check that your Panorama Camera and mobile phone are both compatible with the same WiFi connection protocol.
- Download the appropriate app: Install the required app on your phone to link it with the Panorama Camera for seamless wireless connectivity.
- Follow step-by-step instructions: Carefully follow the manufacturer’s guidelines to properly connect your WiFi Panorama Camera to your phone, ensuring a trouble-free setup.
Understanding WiFi Panorama Camera Technology
How WiFi Panorama Cameras Work
To begin connecting your WiFi panorama camera to your phone, it’s important to understand how these cameras work. These innovative cameras are equipped with WiFi technology, allowing you to connect them to your smartphone or tablet wirelessly. This means you can easily transfer photos and videos from your camera to your device without the need for any cables. WiFi panorama cameras also enable you to remotely control the camera settings and capture photos or videos from your phone.
Key Features and Benefits
Regarding WiFi panorama cameras, there are several key features and benefits that make them a popular choice among photography enthusiasts. Here are some of the key features you can expect from these cameras:
- Wireless connectivity for easy sharing and transferring of files
- Remote control capability from your smartphone
- High-quality panoramic photo and video capabilities
This makes WiFi panorama cameras a versatile and convenient option for capturing stunning panoramic shots and videos with ease.
Understanding the key features and benefits of WiFi panorama cameras can help you make the most out of your photography experience. These cameras are designed to provide you with the flexibility and convenience you need to capture stunning panoramic shots effortlessly. Here are some additional key features you might find useful:
- Compact and portable design for easy carrying
- Various shooting modes for creative photo opportunities
This ensures that you can capture panoramic shots in any setting, whether you’re traveling, attending an event, or simply exploring your surroundings.
Preparing Your Phone for Connection
Checking Phone Compatibility
On the back of your WiFi panorama camera’s packaging, you’ll find a list of compatible devices. Make sure to check if your phone is listed to ensure compatibility. Some cameras may only work with specific operating systems or models.
Ensuring Phone Software is Up-to-Date
Your phone’s software needs to be up-to-date to connect seamlessly with your WiFi panorama camera. Check for any pending updates by going to your phone’s settings, then to the software update section. It’s imperative to have the latest software version to avoid any connectivity issues.
Having the most recent operating system on your phone also ensures that you have access to the latest features and security updates, providing a smoother and more secure connection between your phone and the camera.
Understanding Downloading and Installing the Camera App
On your phone, go to the app store and search for the specific camera app recommended for your WiFi panorama camera model. Download and install the app on your phone. The app will provide you with a user-friendly interface to control and view the images from your camera.
Setting Up Your WiFi Panorama Camera
Unboxing and Physically Setting Up the Camera
To start setting up your WiFi panorama camera, unbox the device and familiarize yourself with its components. Ensure the camera is in working condition by checking for any physical damage. Once you have inspected the camera, mount it securely in a location that provides the desired panoramic view of the area you wish to monitor.
Configuring the Camera’s WiFi Settings
The next step in setting up your WiFi panorama camera is configuring its WiFi settings. Access the camera’s menu to locate the WiFi settings option. Enter the WiFi network name (SSID) and password to connect the camera to your home network.
The camera’s manual should provide detailed instructions on how to navigate through the settings menu to configure the WiFi connection. Make sure to follow the steps carefully to ensure a successful connection.
Tips for Optimal Camera Placement
- Position the camera at an optimal height to capture a wide-angle view of the area.
- Avoid placing the camera near obstructions such as walls or furniture to prevent interference with the WiFi signal.
- Ensure the camera is placed within range of your WiFi router for a stable connection.
While setting up your WiFi panorama camera, remember that its placement plays a crucial role in the quality of the footage you capture. Perceiving the best location for the camera ensures optimal performance and coverage.
A Few More Things to Consider
- Consider the lighting conditions of the area where you plan to install the camera for optimal image quality.
- Perceiving the camera’s field of view helps you determine the ideal location for monitoring your space effectively.
Connecting Your Phone to the WiFi Panorama Camera
Enabling WiFi on Your Phone
Not sure how to connect your WiFi Panorama Camera to your phone? The first step is to enable WiFi on your phone if it isn’t already activated.
Finding and Selecting the Camera’s WiFi Network
Selecting the camera’s WiFi network on your phone is crucial to establish the connection. You’ll need to search for available networks and choose the one that corresponds to your WiFi Panorama Camera.
When you’re trying to locate the camera’s WiFi network, make sure to look for a network name that is similar to the model of your camera. It might be named after the manufacturer or the camera’s model number.
Entering the Camera’s Password and Authenticating
WiFi Password is crucial for connection establishment. You will be prompted to enter the camera’s password on your phone to authenticate the connection. This password is typically provided by the camera’s manufacturer and can usually be found in the camera’s user manual or on the camera itself.
The connection process may vary depending on the camera model, but you’ll typically need to input the password and wait for your phone to authenticate the connection before you can start using the camera’s features.
The connection between your phone and the WiFi Panorama Camera is crucial to control the camera remotely and transfer photos and videos wirelessly. Make sure to follow these steps carefully to ensure a successful connection.
Factors Affecting WiFi Connectivity
Despite the convenience of WiFi connectivity, there are several factors that can affect the strength and reliability of the connection between your panorama camera and your phone. It’s imperative to understand these factors to ensure a smooth and uninterrupted connection. Knowing them will help you troubleshoot any potential issues that may arise.
Distance and Interference
One of the primary factors affecting WiFi connectivity is the distance between your panorama camera and the router. The farther you are from the router, the weaker the signal will be, leading to slow connection speeds or dropped connections. Additionally, interference from other electronic devices or physical barriers like walls can weaken the signal further. To mitigate these issues, make sure your panorama camera is within a reasonable distance from the router and free from any potential sources of interference.
Network Congestion and Bandwidth
Interference from other devices connected to the same network can also impact the WiFi connectivity between your panorama camera and phone. This is especially evident in busy environments with multiple devices competing for bandwidth. To improve connectivity in such situations, prioritize your panorama camera by limiting the number of devices connected to the network or investing in a higher bandwidth plan.
Physical Obstacles and Environmental Factors
To ensure a stable WiFi connection between your panorama camera and phone, you need to consider physical obstacles and environmental factors that can impact the signal strength. Positioning your camera near large metal objects, thick walls, or electronic appliances can interfere with the signal. To optimize connectivity, place your camera in an open space with minimal obstructions.
- Ensure there are no large metal objects obstructing the signal path.
- Avoid positioning the camera near thick walls or electronic appliances that can interfere with the signal.
- Perceiving and eliminating potential sources of interference will help maintain a strong WiFi connection.
WiFi connectivity is crucial for seamless communication between your panorama camera and phone. By understanding the factors that can affect the connection, you can take proactive steps to enhance your WiFi experience and capture stunning panoramic images with ease.
- Ensure there are no large metal objects obstructing the signal path.
- Avoid positioning the camera near thick walls or electronic appliances that can interfere with the signal.
- Perceiving and eliminating potential sources of interference will help maintain a strong WiFi connection.
Troubleshooting Common Connection Issues
Camera Not Detected by Phone
After attempting to connect your WiFi panorama camera to your phone, if the camera is not being detected by your phone, there could be a few reasons for this issue. Any physical barriers or interference between the camera and the phone could be disrupting the connection. Ensure that the camera is in close proximity to your phone and that there are no obstructions blocking the signal.
Unable to Connect to Camera’s WiFi Network
Cameras that require a specific WiFi network for connection may pose issues if you are unable to connect to the camera’s network. If you cannot find the camera’s network in your WiFi settings, try resetting the camera’s WiFi network settings and reconnecting. You may need to consult the camera’s user manual for specific instructions on how to reset the network settings.
This issue may also arise if the camera’s WiFi network has a weak signal or is experiencing technical difficulties. Ensure that the camera’s WiFi network is functioning properly and try moving closer to the camera to establish a stronger connection.
Connection Drops or Intermittent Connectivity
WiFi connection drops or intermittent connectivity issues can be frustrating when trying to connect your WiFi panorama camera to your phone. WiFi signals can be affected by various factors such as distance from the router, interference from other electronic devices, or network congestion. If you experience frequent connection drops, try moving closer to the WiFi router or resetting the router to improve the signal strength.
Common sources of interference include microwaves, cordless phones, and other WiFi networks operating on the same channel. By minimizing interference and optimizing your WiFi setup, you can help reduce connection drops and ensure a more stable connection between your camera and phone.
Advanced Connection Settings and Options
Keep in mind that connecting your WiFi panorama camera to your phone not only involves the basic steps but also includes advanced settings and options that can enhance your overall experience. Below are some advanced connection settings you can explore:
-
Configuring Quality of Service (QoS) Settings
You can adjust the priority of your camera’s network traffic based on application type or specific devices. This can help ensure that your camera’s video streaming gets sufficient bandwidth for smooth operation.
Configuring Quality of Service (QoS) Settings
With QoS settings, you can prioritize your camera’s network traffic to ensure that video streaming is smooth and uninterrupted. By adjusting the priority based on application type or specific devices, you can guarantee that the necessary bandwidth is allocated for your camera’s operation. This can be particularly useful in busy network environments where other devices may compete for bandwidth.
-
Setting Up Port Forwarding and NAT
You can configure port forwarding on your router to enable remote access to your camera from outside your home network. This allows you to access the camera’s live feed or recordings from anywhere using your phone.
Setting Up Port Forwarding and NAT
If you wish to access your camera remotely from outside your home network, you can set up port forwarding and NAT (Network Address Translation) on your router. By doing so, you enable external access to your camera, allowing you to view live feeds or recorded footage on your phone from anywhere. This can be handy for checking in on your home while you’re away or monitoring a property in real-time.
Settings
It’s important to note that configuring port forwarding and NAT requires technical knowledge and access to your router’s settings. Be sure to follow specific instructions provided by your camera’s manufacturer or consult with your Internet Service Provider for assistance to set up this feature correctly.
Using Dynamic DNS for Remote Access
Service
If you want a more convenient way to access your camera remotely, you can consider using Dynamic DNS (Domain Name System). Dynamic DNS allows you to assign a domain name to your camera’s IP address, making it easier to remember and access from anywhere in the world. This service automatically updates the IP address, ensuring seamless connectivity even if your IP changes.
Settings
Dynamic DNS can be a useful tool for remote access to your camera, especially if you don’t have a static IP address from your Internet Service Provider. By setting up Dynamic DNS, you can easily access your camera using a custom domain name, making the remote viewing experience more user-friendly and accessible.
How to Use Your Phone to Control the WiFi Panorama Camera
Accessing Camera Settings and Features
To access the camera settings and features using your phone, you can open the camera app on your device and connect to the WiFi network of the panorama camera. Once connected, you can navigate through the settings on your phone’s screen to adjust various features such as resolution, timer settings, and exposure levels. This allows you to conveniently control the camera without needing to touch the device directly.
Adjusting Camera Settings for Optimal Performance
To ensure optimal performance of your WiFi panorama camera, you can adjust settings such as white balance, ISO, and video quality directly from your phone. This enables you to customize the camera’s settings based on your surroundings and the type of photo or video you want to capture.
For instance, you can increase the ISO setting for low-light conditions or adjust the white balance to improve color accuracy in your photos. Experimenting with different settings will help you understand how each one affects the final outcome, allowing you to capture high-quality images and videos every time.
Capturing and Viewing Photos and Videos
Assuming you have set up your panorama camera and adjusted the settings, you can now start capturing photos and videos using your phone as a remote control. Simply frame your shot on the phone screen, adjust any necessary settings, and press the capture button to take a photo or start recording a video. You can then view the captured media directly on your phone, making it easy to review and share your content instantly.
A key benefit of using your phone to control the WiFi panorama camera is the convenience and flexibility it offers. You can capture stunning panoramic images and immersive videos with ease, all while having full control at your fingertips.
Tips for Optimizing WiFi Panorama Camera Performance
Your WiFi panorama camera’s performance can be optimized by following a few tips to ensure smooth operation and high-quality footage. Here are some suggestions to help you get the most out of your device:
Reducing Lag and Latency
- Position your camera and phone closer to the WiFi router to improve signal strength and decrease lag.
- Close unnecessary apps on your phone to free up memory and resources for a smoother connection.
- Make sure your camera firmware and phone software are up to date to ensure compatibility and optimal performance.
Though some lag and latency may still occur due to the nature of wireless connections, these tips can help minimize disruptions and delays in your viewing experience.
Improving Video Quality and Resolution
Assuming your WiFi panorama camera supports higher resolutions, make sure to select the highest quality settings for the best video output. This will result in sharper, clearer footage that captures more detail and depth in your panoramic shots.
Camera lenses and sensors play a crucial role in determining the overall video quality, so investing in a camera with quality components can significantly enhance your footage.
Minimizing Battery Drain and Power Consumption
Optimizing your WiFi panorama camera’s settings, such as reducing screen brightness and turning off unnecessary features when not in use, can help minimize battery drain and extend your device’s operational time.
Power-saving modes and settings on your camera can also help conserve energy and ensure you can capture more panoramic shots without worrying about running out of battery.
How to Secure Your WiFi Panorama Camera Connection
Changing Default Passwords and Admin Credentials
Unlike some other smart devices, WiFi panorama cameras are not immune to security risks. To ensure that your camera is not vulnerable to unauthorized access, it is crucial to change the default passwords and admin credentials immediately after setting up the device. Default passwords are easily available online, and leaving them unchanged can make your camera an easy target for hackers.
Clearly, changing the default login information to unique and complex passwords will significantly enhance the security of your WiFi panorama camera. Remember to use a mix of letters, numbers, and special characters for a strong password that is difficult to guess.
Enabling Encryption and Secure Protocols
Camera encryption and secure protocols are necessary for safeguarding the data transmitted between your WiFi panorama camera and connected devices. By enabling encryption like WPA2 and SSL/TLS protocols, you can prevent unauthorized users from intercepting or tampering with the data being exchanged.
Camera encryption and secure protocols ensure that the communication between your camera and phone is encrypted, making it much harder for hackers to access your footage or spy on your live streams. By enabling these security measures, you can rest assured that your privacy is protected.
Camera encryption and secure protocols ensure that the communication between your camera and phone is encrypted, making it much harder for hackers to access your footage or spy on your live streams.
Restricting Access and Setting Up Guest Networks
Panorama cameras are a convenient way to monitor your home, but you need to be cautious about who can access the camera feed. The best way to secure your WiFi panorama camera is by restricting access to authorized users only. Create separate user accounts with limited privileges for family members or trusted individuals who need access to the camera.
The ability to set up guest networks for your WiFi panorama camera is another security feature that can help protect your home network. By creating a separate network specifically for guests, you can ensure that they do not have access to your primary network and connected devices, adding an extra layer of security to your setup.
The ability to set up guest networks for your WiFi panorama camera is another security feature that can help protect your home network.
Understanding the Importance of Security Updates
Security updates are crucial for keeping your WiFi panorama camera protected against the latest threats and vulnerabilities. Manufacturers regularly release firmware updates that patch security flaws and improve the overall security of the device. Make sure to regularly check for updates and install them promptly to ensure that your camera remains secure.
Integrating Your WiFi Panorama Camera with Other Devices
Connecting to Smart Home Systems and Hubs
Many WiFi panorama cameras are compatible with smart home systems and hubs, allowing you to integrate your camera into your existing smart home setup. Your camera can be connected to devices such as smart lights, thermostats, and security systems, enabling you to create a seamless smart home experience. By connecting your camera to a smart home hub, you can control all your devices from one central app.
Using IFTTT Recipes and Automation
WiFi panorama cameras often support IFTTT (If This Then That), a popular automation platform that allows you to create custom recipes for your devices. With IFTTT, you can set up automated tasks and interactions between your camera and other devices in your home. For example, you can create a recipe that triggers your camera to start recording whenever your smart motion sensor detects movement. This level of automation can enhance the functionality and convenience of your WiFi panorama camera.
Using IFTTT with your WiFi panorama camera opens up a world of possibilities for customization and automation. You can create custom triggers and actions based on various conditions, allowing you to tailor your camera’s functionality to suit your specific needs. Whether you want to receive alerts on your phone when your camera detects motion or automatically upload recorded footage to the cloud, IFTTT offers endless possibilities for enhancing your camera’s capabilities.
Streaming to Social Media and Cloud Services
Camera WiFi panorama cameras often allow you to stream live footage directly to social media platforms and cloud services. With a few simple steps, you can share your camera’s panoramic view with friends and followers in real-time. Whether you want to livestream a scenic view from your camera or share a special moment with loved ones, streaming to social media and cloud services is a convenient way to stay connected.
Using social media and cloud services with your WiFi panorama camera gives you the flexibility to share your experiences with a wider audience. You can easily stream live videos to platforms like Facebook or YouTube, or store recorded footage in the cloud for easy access and sharing. This feature is perfect for capturing and sharing memorable moments with friends and family, no matter where you are.
Advanced Camera Features and Settings
For optimal use of your WiFi Panorama Camera, you can explore advanced features and settings that enhance its functionality. Below, you will find a breakdown of some key features and settings that you can configure to maximize the performance of your camera.
-
Using Motion Detection and Alerts
Some WiFi Panorama Cameras come equipped with motion detection capabilities that allow the camera to detect movement within its field of view. You can configure the camera to send you alerts on your phone when motion is detected, ensuring you are aware of any activity in the monitored area.
-
Configuring Night Vision and Low-Light Settings
LowLight Some WiFi Panorama Cameras are designed to provide clear images even in low-light conditions or complete darkness. By configuring the night vision and low-light settings, you can ensure that your camera captures high-quality footage regardless of the lighting conditions.
Night You can adjust the sensitivity of the night vision mode and customize the camera settings to optimize the visibility of objects in the dark. This feature is especially useful for monitoring areas that may have poor lighting.
-
Enabling Audio Recording and Two-Way Audio
Clearly By enabling audio recording on your WiFi Panorama Camera, you can not only capture video footage but also record audio, providing a more comprehensive monitoring solution. Some cameras also offer two-way audio capabilities, allowing you to communicate with individuals near the camera.
Configuring these advanced features and settings on your WiFi Panorama Camera can enhance its functionality and provide you with a more robust monitoring solution tailored to your specific needs.
Common Mistakes to Avoid When Connecting Your WiFi Panorama Camera
Failing to Update Camera Firmware
All WiFi panorama cameras require regular firmware updates to ensure optimal performance and security. If you fail to update your camera’s firmware, you may experience connectivity issues when trying to connect it to your phone. Make it a habit to check for firmware updates regularly and install them to keep your camera running smoothly.
Not Securing the Camera’s WiFi Network
When setting up your WiFi panorama camera, it is crucial to secure the camera’s WiFi network with a strong password. Failing to secure your camera’s network can leave it vulnerable to hacking and unauthorized access. Make sure to change the default password to a unique and secure one to protect your camera and the footage it captures.
Ignoring Camera Maintenance and Troubleshooting
When you encounter issues with connecting your WiFi panorama camera to your phone, it’s vital to perform regular maintenance and troubleshooting steps. Check for any physical damage, clean the camera lens, and ensure that the camera’s settings are correct. Ignoring these maintenance tasks can lead to further connectivity problems down the line.
Final Words
Ultimately, connecting your WiFi panorama camera to your phone can open up a whole new world of possibilities for capturing stunning photos and videos. By following the step-by-step instructions provided, you can easily establish a seamless connection between your camera and phone, allowing you to remotely control and access your camera’s features with ease. Whether you’re a photography enthusiast looking to expand your creative horizons or simply want to improve your workflow, connecting your camera to your phone is a simple but powerful way to enhance your experience.
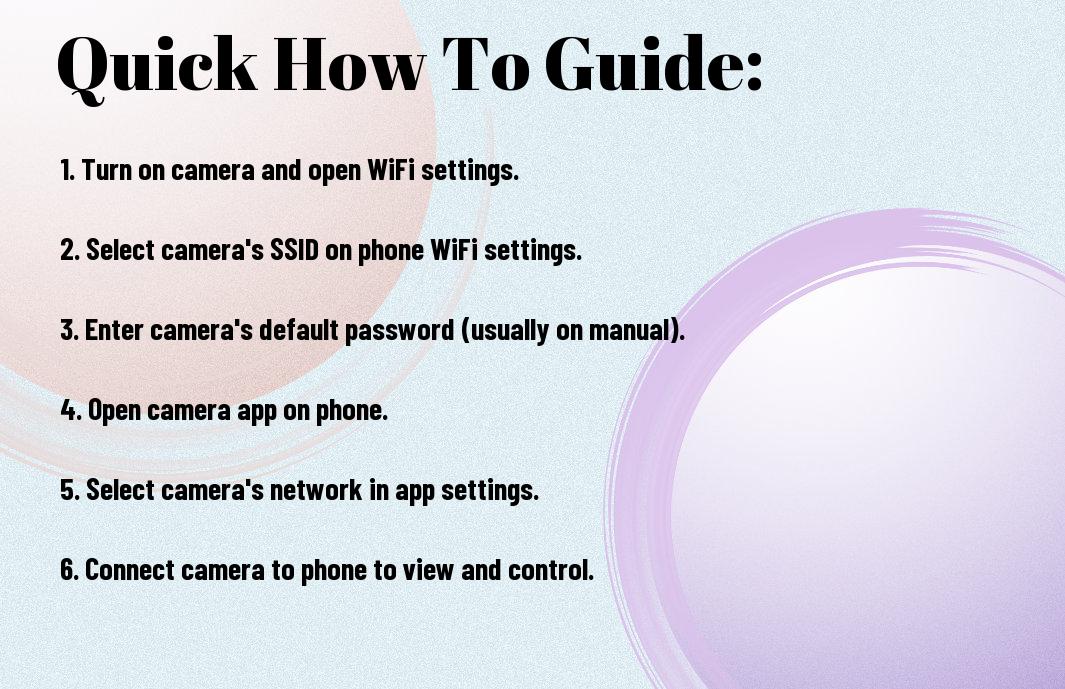
Q: What do I need to connect my WiFi Panorama Camera to my phone?
A: You will need to have your WiFi Panorama Camera fully charged, your phone with the compatible app installed, and both devices within the same WiFi network.
Q: How do I turn on the WiFi on my Panorama Camera?
A: To turn on the WiFi on your Panorama Camera, go to the camera’s settings menu and look for the WiFi option. Enable WiFi and make sure it is visible to other devices.
Q: How do I connect my phone to the Panorama Camera’s WiFi network?
A: On your phone, go to the WiFi settings and look for the Panorama Camera’s WiFi network in the list of available networks. Select the camera’s network and enter the password if prompted.
Q: How do I pair the camera with the app on my phone?
A: Open the app on your phone and look for the option to connect to a camera or device. Select your Panorama Camera from the list of available devices and follow the on-screen instructions to complete the pairing process.
Q: How can I view and control my Panorama Camera from my phone once connected?
A: Once connected, you can use the app on your phone to view the camera’s live feed, adjust settings, capture photos or videos, and even remotely control the camera if supported by the model.