Many times, you may find yourself needing to connect Alexa to WiFi without using the app. Luckily, there are alternative methods you can use to successfully set up your Alexa device. Follow these simple steps to get your Alexa connected to WiFi without the app hassle-free.
Key Takeaways:
- Use a Web Browser: You can connect Alexa to WiFi by using a web browser on a computer or mobile device.
- Access Alexa’s Settings: Enter “alexa.amazon.com” or “echosetup.amazon.com” in the browser’s address bar to access Alexa’s settings for WiFi setup.
- Follow on-screen Instructions: Proceed with the setup process by following the on-screen instructions to connect Alexa to the WiFi network.

Understanding Alexa’s WiFi Connection
How Alexa Connects to WiFi
With Alexa, connecting to WiFi is vital for enabling all its smart features. Alexa relies on a stable WiFi connection to access a wide range of services, including playing music, checking the news, controlling smart home devices, and more. When setting up Alexa for the first time, you’ll need to connect it to your WiFi network to ensure seamless functionality.
Importance of WiFi Connection for Alexa
WiFi is the lifeblood of your Alexa device, as it allows you to communicate with Alexa’s cloud-based service, where all the magic happens. When your Alexa device is connected to WiFi, it can quickly process your commands, fetch information, and perform various tasks with minimal latency. Without a WiFi connection, Alexa vitally becomes a voice-activated paperweight, unable to access the internet and provide you with the assistance you need.
Another crucial aspect of having a stable WiFi connection for Alexa is ensuring that software updates are downloaded and installed seamlessly. These updates are vital for keeping your device secure, improving performance, and adding new features. Without a WiFi connection, your Alexa device may miss out on these updates, which could compromise its functionality over time.
Preparing Your Alexa Device
Unboxing and Initial Setup
For a smooth setup process, start by unboxing your Alexa device and checking if all the components are included. Plug in your device and follow the on-screen instructions for the initial setup. Make sure your device is powered on and ready to connect to a WiFi network.
Physical Placement for Optimal WiFi Signal
Clearly, the placement of your Alexa device can have a significant impact on its ability to connect to a WiFi network. Place your device in a central location within your home and away from any obstructions that may interfere with the WiFi signal. Avoid placing it near electronic devices that could cause interference.
Your Alexa device should ideally be placed at a height where it is easily accessible and has a clear line of sight to your WiFi router. This ensures a stable connection and optimal performance for voice commands and smart home controls.
Alternative Methods for Connecting Alexa to WiFi
Using the Alexa Web Interface
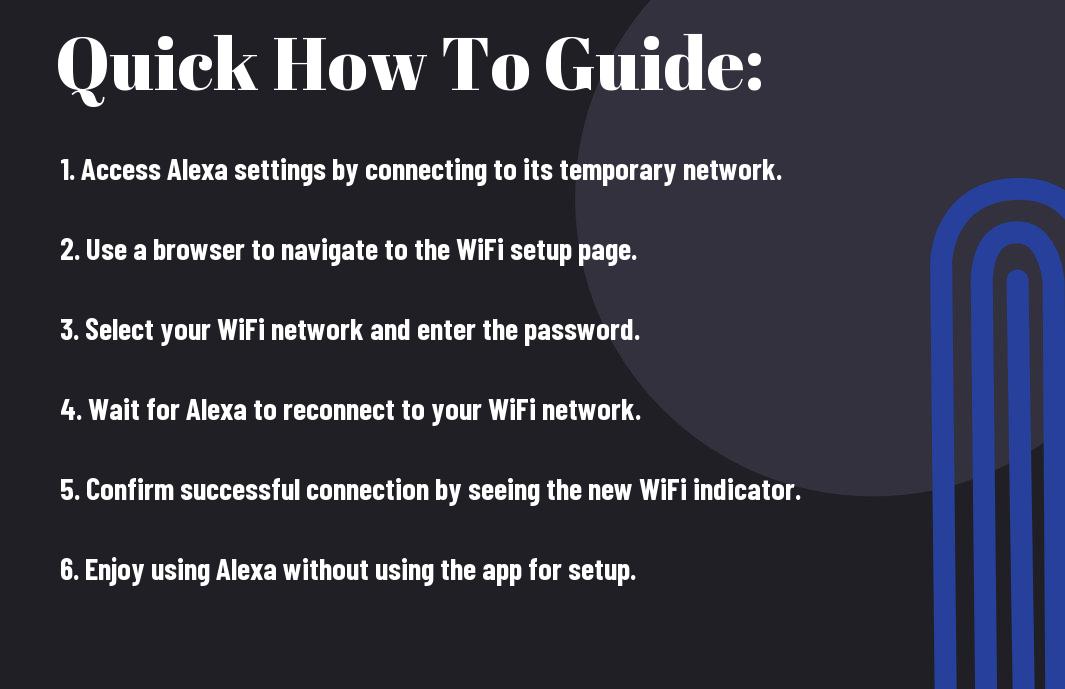
All set to connect your Alexa device to WiFi but don’t have the app handy? No worries! The Alexa web interface comes to your rescue. Clearly, you can access the Alexa web interface from any browser on your computer or smartphone. Simply go to alexa.amazon.com and log in with your Amazon account credentials. From there, you can navigate to the settings for your Alexa device and connect it to your WiFi network.
Utilizing the Amazon Website for Connection
To connect your Alexa device to WiFi without the app, you can also utilize the Amazon website. To do this, head over to the Amazon homepage and log in to your account. Then, navigate to the “Your Account” section and select “Manage Your Content and Devices.” From there, click on the “Devices” tab and select your Alexa device. You will find the option to connect your device to a WiFi network right there, without the need for the app.
Alexa’s integration with the Amazon website provides you with an alternative method to set up and connect your device to WiFi without relying on the app. This way, you can easily manage your Alexa device settings and connections directly from your Amazon account, making the process seamless and convenient for you.
Tips for a Smooth WiFi Connection
For a smooth WiFi connection when setting up Alexa without the app, here are some helpful tips:
Restarting Your Router and Alexa Device
Clearly, one of the first steps you should take if you’re experiencing connection issues is to restart both your router and Alexa device. Sometimes, a simple reset can help resolve any temporary glitches that may be causing the connection problems.
Perceiving the settings to restart your router and Alexa device may vary, but typically you can power off both devices, wait for a few minutes, and then power them back on to see if the connection improves.
Moving Alexa Closer to the Router
Any obstructions or distance between Alexa and your router can weaken the WiFi signal, making it harder for them to communicate effectively. If you’re encountering connectivity issues, try moving Alexa closer to the router to strengthen the signal.
Alexa works best when it’s within a reasonable distance from the router, so consider placing it in a central location in your home to ensure a stable connection.
Reducing Interference from Other Devices
Device interference can disrupt your WiFi connection and affect Alexa’s performance. Make sure to keep Alexa away from other electronic devices that may cause interference, such as microwaves, cordless phones, or Bluetooth speakers.
Router placement is crucial too – keep it away from potential sources of interference and place it in an open area for optimal signal distribution throughout your home.
Factors Affecting WiFi Connection Strength
Physical Barriers and Obstructions
To ensure a strong WiFi connection for your Alexa device, you need to consider the physical barriers and obstructions in your home. Common obstacles like walls, floors, and large furniture can weaken the WiFi signal, making it harder for your Alexa device to connect reliably. Positioning your Alexa device in a clear line of sight to the router can help minimize these obstacles and improve the connection quality.
- Place your router in a central location in your home to minimize barriers.
- Avoid placing your Alexa device near thick walls or large pieces of furniture that can block the signal.
Any obstruction between your Alexa device and the router can impact the WiFi connection strength, so it’s imperative to position your devices strategically for optimal performance.
Distance from the Router
To ensure a stable WiFi connection for your Alexa device, you need to consider the distance from the router. The farther you are from the router, the weaker the signal strength will be. If your Alexa device is too far away, it may struggle to maintain a consistent connection, leading to interruptions in service. Positioning your Alexa device closer to the router can help improve the signal strength and reliability of your WiFi connection.
You can use WiFi extenders or mesh network systems to expand the coverage of your WiFi network and ensure that your Alexa device stays connected even in areas far from the router.
Network Congestion and Bandwidth
Little factors like network congestion can also affect the strength of your WiFi connection. If you have multiple devices connected to the same network or if your internet service provider has limited bandwidth, it can lead to slower speeds and a weaker connection for your Alexa device. To ensure a strong WiFi connection, try to limit the number of devices connected to the network simultaneously and consider upgrading to a higher bandwidth plan if necessary.
WiFi signals operate on different channels, so it’s imperative to choose the optimal channel for your router to minimize interference and improve the overall performance of your WiFi network.
Troubleshooting Common WiFi Connection Issues
Alexa Not Connecting to WiFi
To troubleshoot when Alexa is not connecting to WiFi, check if the device is within range of the WiFi router and that there are no physical obstructions blocking the signal. Restart your Alexa device and the WiFi router, ensuring both are on the same network. You may also try resetting your WiFi password and reconnecting Alexa to the network.
Dropping WiFi Connection Frequently
Little interruptions in the WiFi connection can be frustrating, especially when using Alexa. To resolve this issue, you can try moving your Alexa device closer to the WiFi router to improve signal strength. Make sure there are no other devices causing interference, such as microwaves or cordless phones, and consider upgrading your router for better performance.
Dropping WiFi connections frequently can be a sign of network congestion or a weak signal. If moving the devices closer together doesn’t solve the problem, you may need to invest in a WiFi extender to boost the signal throughout your home.
Slow WiFi Speeds
With slow WiFi speeds, your Alexa device may not function optimally. To address this issue, try restarting your router and modem, as well as limiting the number of devices connected to the network. You can also position the router in a central location in your home and away from obstructions for better coverage.
WiFi speed can also be affected by the internet plan you have. If you consistently experience slow speeds, consider upgrading to a higher-speed plan from your Internet Service Provider (ISP) to ensure smooth operation of your Alexa device.

How to Connect Alexa to WiFi Using WPS
Understanding WPS (Wi-Fi Protected Setup)
While setting up your Alexa device, you may come across the option to connect to WiFi using WPS. WPS stands for Wi-Fi Protected Setup, a feature that allows you to easily connect devices to a secure WiFi network without entering the password.
WPS works by pressing the WPS button on your router and then initiating the connection on your Alexa device within a specific timeframe. This method eliminates the need to manually input the WiFi password, making the connection process quick and seamless.
Enabling WPS on Your Router
If your router supports WPS, you can enable this feature by accessing your router’s settings. Look for the WPS option in the settings menu and make sure it is turned on. This will allow your router to accept WPS connections from devices like Alexa.
Alexa will prompt you to press the WPS button on your router during the setup process. Once the WPS button is pressed on the router, the connection between your router and Alexa will be established automatically. This method is convenient and secure, ensuring a hassle-free WiFi setup for your Alexa device.
Connecting Alexa to WiFi via WPS
Your Alexa device will guide you through the steps to connect to WiFi using WPS. Simply follow the instructions on the Alexa app or device screen to initiate the WPS connection. Remember to press the WPS button on your router within the specified timeframe to complete the setup.
Another benefit of using WPS to connect Alexa to WiFi is that it maintains the security of your network by encrypting the connection between your device and the router. This method is especially useful if you prefer a hands-free approach to WiFi setup and value security in your smart home ecosystem.
Using Ethernet Cables for a Wired Connection
Benefits of a Wired Connection
Cables are the most reliable way to connect your Alexa device to the internet. By using an Ethernet cable, you ensure a stable and secure connection for your device. This can be particularly helpful in areas where WiFi signals might be weak or unreliable.
Setting Up an Ethernet Connection on Alexa
On the back of your Alexa device, you will find an Ethernet port. Simply plug one end of the Ethernet cable into this port and the other end into your router or modem. Once connected, your Alexa device should automatically switch to using the wired connection.
With an Ethernet connection, you won’t have to worry about interference from other wireless devices or signal loss over distance. This can result in faster response times and smoother interactions with your Alexa device.
Troubleshooting Ethernet Connection Issues
Assuming you have correctly plugged in the Ethernet cable and there are no physical damages, check the connection on your router or modem. Make sure the Ethernet port is enabled and working properly. You may also want to try using a different Ethernet cable to rule out any potential issues with the cable itself.
Setting up an Ethernet connection on your Alexa device is a straightforward process that can provide a more reliable and stable internet connection. By using Ethernet cables, you can ensure consistent internet access for your Alexa device, especially in areas with unreliable WiFi signals.
Resetting Your Alexa Device’s WiFi Settings
When to Reset WiFi Settings
Despite your best efforts, there may be times when your Alexa device is having trouble connecting to WiFi. This could be due to a change in your network settings or if you’re experiencing frequent disconnects. In such cases, resetting the WiFi settings on your Alexa device can help resolve the issue.
How to Reset WiFi Settings on Alexa
Settings: If you need to reset the WiFi settings on your Alexa device, the process is straightforward. First, press and hold the action button on your Alexa device for about 25 seconds until the light ring turns orange. This indicates that your device is in setup mode. Once in setup mode, you can proceed to connect your Alexa device to a new WiFi network using the Alexa app on your smartphone or tablet.
Now, before you follow the steps to reset your Alexa device’s WiFi settings, make sure you have your new network’s SSID and password ready. Once your Alexa device is in setup mode, you will need this information to reconnect it to the internet.
Post-Reset Configuration
Configuration: After you’ve successfully reset the WiFi settings on your Alexa device and connected it to a new network, you may need to reconfigure some of your device settings. This can include setting up preferred music services, enabling skills, or adjusting other preferences within the Alexa app.
Understanding: Resetting your Alexa device’s WiFi settings is a useful troubleshooting step that can help you get your device back online and working seamlessly with your new network. By following the steps outlined, you can quickly re-establish a connection and continue enjoying the benefits of your Alexa-enabled smart home device.
Advanced WiFi Settings for Alexa
-
Changing WiFi Network Names and Passwords
If you need to update your WiFi network name (SSID) or password for Alexa, you can do so by accessing your router’s settings. If you encounter any issues after updating the WiFi network name or password, you may need to reset your Alexa device and set it up again with the new credentials. Configuring WiFi Channel and Frequency
WiFi channels and frequencies can impact the performance of your Alexa device. You can optimize its connection by selecting a less congested WiFi channel. Enabling Quality of Service (QoS) Settings
Clearly, QoS settings prioritize network traffic for your Alexa device, ensuring a smoother experience. You can enable this feature in your router settings.
Passwords: Remember to keep your WiFi network password secure to prevent unauthorized access to your network and Alexa device.
WiFi Connection Security Best Practices
Using Strong WiFi Passwords
Once again, when setting up your WiFi connection, it’s vital to use a strong password to protect your network from unauthorized access. A strong password should be at least 12 characters long and include a mix of uppercase and lowercase letters, numbers, and symbols. Avoid using easily guessable information such as your name, address, or birthdate.
Enabling WPA2 Encryption
Practices like enabling WPA2 encryption on your WiFi network add an extra layer of security by encrypting the data transmitted between your devices and the router. This encryption protocol is more secure than the older WEP encryption and helps prevent unauthorized users from intercepting your data.
Avoid using outdated encryption methods like WEP, as they are easily crackable by hackers. By enabling WPA2 encryption on your WiFi network, you can significantly enhance the security of your connections and protect your data from potential threats.
Regularly Updating Router Firmware
Some routers may have vulnerabilities that hackers can exploit to gain access to your network. Regularly updating your router’s firmware can help patch these vulnerabilities and keep your network secure. Manufacturers release firmware updates periodically to address security issues and improve performance.
The firmware is vitally the software that runs on your router, and keeping it up to date is crucial for maintaining a secure network. By ensuring that your router’s firmware is always updated, you can protect your network from potential security threats and ensure smooth operation.
Common WiFi Connection Errors and Solutions
Error Codes and Meanings
After attempting to connect Alexa to WiFi without the app, you may encounter error codes that can be frustrating to decipher. Some common error codes include ‘WIFI_FAIL’, ‘AUTH_ERR’, ‘CONNECTION_LOST’, or ‘UNABLE_TO_JOIN’. These errors usually indicate issues with your WiFi network, password, or signal strength.
Resolving WiFi Connection Errors
Connection issues can arise due to various reasons, such as incorrect WiFi passwords, network congestion, or incompatible router settings. If you encounter an error while connecting Alexa to WiFi, first, ensure that you have entered the correct password. Restarting your router and Alexa device can also help resolve connectivity issues. Additionally, moving your Alexa device closer to the router can improve signal strength and connectivity.
Plus, if you continue to face WiFi connection errors, you can reset your router and Alexa device to their factory settings. This can help clear any network settings that may be causing the connection problems and allow you to start fresh with the setup process.
Preventing Future Errors
There’s no surefire way to prevent all WiFi connection errors, but there are steps you can take to minimize the likelihood of encountering them. When setting up Alexa or any other smart device, always ensure that you have a stable and reliable WiFi network. Make sure to use a strong and secure password to protect your network from unauthorized access.
Connection errors can be frustrating, but by following these tips and troubleshooting steps, you can effectively resolve WiFi connectivity issues and enjoy a seamless experience with your Alexa-enabled devices.
How to Connect Multiple Alexas to WiFi
Setting Up a WiFi Network for Multiple Devices
If you have multiple Alexa devices in your home, you’ll need to set up a robust WiFi network to ensure they all stay connected. Make sure your WiFi router is placed in a central location in your home to provide optimal coverage to all your devices. Consider investing in a mesh WiFi system if you have a large house to eliminate any dead zones.
Configuring Each Alexa Device for WiFi
Network security is important when setting up multiple Alexa devices on your WiFi network. Make sure to use a strong and unique password for your WiFi network to prevent unauthorized access. When configuring each Alexa device, you’ll need to enter the WiFi network name and password to establish a secure connection.
It’s crucial to ensure that each Alexa device is properly connected to your WiFi network to function correctly. Double-check the network settings on each device to avoid any connectivity issues and make sure they are all on the same network to enable seamless communication between them.
Managing Multiple Alexa Devices on WiFi
Even though you have multiple Alexa devices connected to the same WiFi network, you can manage them individually through the Alexa app. You can rename each device, assign them to specific rooms, and create groups for simultaneous playback or smart home automation.
Devices such as the Echo Dot, Echo Show, or Echo Plus can work together to enhance your smart home experience. You can control multiple devices with a single command, stream music across all devices, or create routines that activate different devices at scheduled times.
Conclusion
Considering all points, you have learned several alternative methods to connect your Alexa device to WiFi without using the app. Whether you opt to connect through a web browser, your router settings, or a mobile hotspot, there are various options available to help you set up your device and start using it with ease.
By following the steps outlined in this guide, you will be able to successfully connect Alexa to WiFi without the app. These alternative methods provide flexibility and convenience, ensuring that you can enjoy the full functionality of your Alexa device even if you encounter difficulties with the app. With a bit of patience and perseverance, you can easily connect your Alexa device to WiFi and start using it to its full potential.
FAQ
Q: Can I connect Alexa to WiFi without using the Alexa app?
A: Yes, there are alternative methods to connect Alexa to WiFi without using the app.
Q: What alternative methods can I use to connect Alexa to WiFi?
A: You can connect Alexa to WiFi using a web browser, by connecting through the Alexa device settings, or by using the Amazon website to manually update the WiFi settings.
Q: How do I connect Alexa to WiFi using a web browser?
A: Simply connect to the Amazon WiFi network on your computer or mobile device, open a web browser, and follow the on-screen instructions to connect Alexa to your WiFi network.
Q: Can I change the WiFi settings of my Alexa device without using the app?
A: Yes, you can change the WiFi settings of your Alexa device by accessing the device settings either through the Alexa app or by using a web browser.
Q: Is it necessary to use the Alexa app to connect Alexa to WiFi?
A: No, it is not necessary to use the Alexa app to connect Alexa to WiFi. You can use alternative methods as mentioned earlier to set up the WiFi connection for your Alexa device.